Blog: How to use graphic organisers in the classroom (part two)
In this blog, Tom Beakes, explains how to use graphic organisers in the classroom, including how to adapt them to ensure they are accessible for learners.

In part one of this blog, we explored ideas for choosing the right graphic organiser to support learners using English as an Additional Language (EAL). In this second part, we will look at how to use graphic organisers in the classroom. Below is a framework for selecting and using a graphic organiser:
- Establish the need for a graphic organiser.
- Choose the best type of graphic organiser to meet your requirements.
- Adapt the graphic organiser for your learners’ needs.
- Put it into use.
There is not space here to explain in detail every type of graphic organiser available. Instead let us explore two case studies which show how a teacher might choose a graphic organiser.
Case study one: writing a book review (upper primary, 10-11 year-olds)
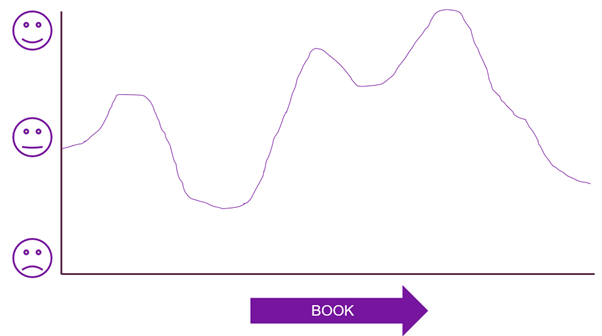
The teacher wants the students to write a review of a book they have been reading for pleasure. As a preparation exercise the teacher wants the students to consider which parts of the book they most enjoyed. The teacher asks the students to create a line graph showing how much they liked different parts of the book. The students draw the graph themselves and label it with key events. This is then used as the basis for a discussion task where students work in small groups to share their favourite/least favourite parts of their book and give reasons. The students then write the review following a model provided by the teacher, incorporating the ideas emerging from their line graph and discussions.
Case study two: giving a presentation on protecting the local environment (secondary, 13-14 year-olds)
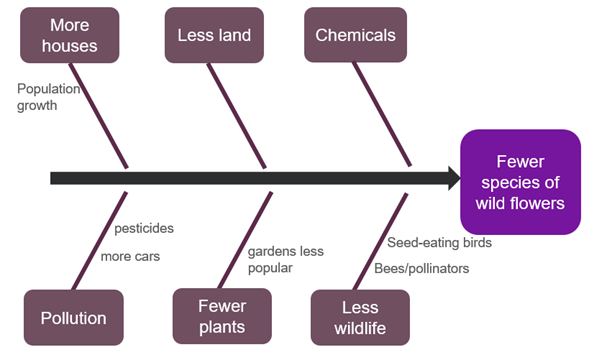
The teacher wants the students to work in small groups to research and present possible solutions to various negative environmental trends as published in a recent Government report. The teacher gives each group a different area to explore. The students are introduced to the concept of an Ishikawa (fishbone) diagram, using a model. Their task is to complete their own Ishikawa diagram for their selected environmental trend to show possible causes and sub-causes. This information is then used as the basis for discussing possible solutions which are then incorporated into a presentation to be shared with peers.
As students become more accustomed to working with different types of graphic organisers, the teacher can ask the students to decide for themselves which graphic organiser to use. This is an important part of building independent learning skills by giving learners strategies for organising and presenting their ideas.
How to adapt graphic organisers
Once you have selected a graphic organiser that suits the requirements of the topic or task you are working on, you may need to adapt it to make it accessible to learners using EAL. Here are some questions to consider when adapting graphic organisers:
- Do I need to scaffold the language used in the graphic organiser? For example, can you add examples to show learners who are in the early stages of English language acquisition how to get started; can you add visuals to show meaning; can you add translations?
- Can you make completing or using the graphic organiser a collaborative task? This is an excellent opportunity for low-stakes language practice and peer-sharing.
- What type of communication will need to take place for learners to complete the collaboration? Can you provide sentence starters, prompts, substitutions or word mats to facilitate this? Can you enlist the help of an EAL specialist to help you create materials for scaffolding language?
Considerations when using graphic organisers
If you have followed the steps described in parts one and two of this blog, you should have an economical and information-rich graphic organiser ready for your students to use – but now what? Here are some practical considerations when putting graphic organisers into use in the classroom.
- Providing explanations or demonstrations: How will your learners use the graphic organiser to help them succeed in the designated task? Is this self-evident or will it require explanation? Will you need to show them how to use or complete it?
- Timing: At what point in the learning activity should learners use the graphic organiser? Can they refer to it throughout the task? Or is it something to be used pre-task as a revision or review tool before completing a task independently? It is important not to assume students will immediately grasp the rationale for using a graphic organiser so be prepared to make this clear as part of any learning activity which makes use of one.
- Reusing and revisiting materials: Graphic organisers can make valuable review or revision tools. Consider how you can re-use graphic organisers. If you want learners to refer back to them, make sure they are saved somewhere accessible. Recycling and re-encountering language is crucial to acquiring it, so re-visiting previously completed graphic organisers can be a way to achieve this.